
Messaging is a widely used technique in enterprise software development and is mostly used for asynchronous processing of long jobs using queues like processing, distribution of workloads in a clustered environment, integration of different systems or subsystems. In Microservices it is used for interservice asynchronous communication.
RabbitMQ is an open-source message broker which is lightweight and easy to deploy and work with. There is some commercial distribution also by different vendors but community distribution is also very efficient and stable.
This can be installed on Windows, Mac, Linux, and dockers distribution is also available. For download and installation, you can refer to this.
I will use docker of Linux for this tutorial.
RabbitMQ setup in Linux
You can use the latest 3.9 series distribution from docker hub for learning purposes. You can run in interactive or in background mode.
In the Docker command, The first port mapping is for RabbitMQ listen and the second port is used for the management console. You can change port mapping and explore more about docker commands on the docker website.
docker run -it --rm --name rabbitmq -p 5672:5672 -p 15672:15672 rabbitmq:3.9-management
or for ditached/backround mode
docker run -d --rm --name rabbitmq -p 5672:5672 -p 15672:15672 rabbitmq:3.9-management
Above docker command will pull docker image in start running. You can check the status using docker ps command and by accessing the RabbitMQ management console from a web browser.

Now RabbitMQ is up and running, you can use it.
RabbitMQ Exchange and Topic Details
RabbitMQ is based on AMQP (Advance messaging Queue Protocol). There are many brokers which support AMQP and RabbitMQ is one of them.
Before working with RabbitMQ broker you should learn about basic concepts of Exchange, Bindings, and queue.
In any messaging exchange, there will be two types of parties
- Producer(s): Producers programe will push messages into the RabbitMQ
- Consumer(s): Consumers will consume the messages.
In traditional messaging systems are all message exchanges are done by topics but in RabbitMQ a producer will not push any message to the topic directly.
In RabbitMQ all messages with pushed to an exchange. Exchange is a RabbitMQ object which will further route messages to a Topic bases on exchange type and routing keys.
- Default Exchange
- Direct Exchange
- Fanout Exhange
- Topic Exchange
- Headers Exchange
- Dead Letter Exhanges
For a detailed understanding of exchange type and their uses scenario, you must read this RabiitMQ exchange documentation for details of exchange types. This post has one youtube vie also.
Binding is used to define routes between exchange and a queue.
Spring Boot RabbitMQ Example
RabbitMQ provided a Java client to work with RabbitMQ. We can use that lib and develop Spring Boot Application or we can use Spring Boot’s amqp starter and spring configuration to develop Spring Boot application with Rabbit MQ.
In this example, we will use the spring-boot-starter-amqp library as most of the code is already there.
In this example, I used Gradle build with the following dependencies.
dependencies {
	implementation 'org.springframework.boot:spring-boot-starter-amqp'
	implementation 'org.springframework.boot:spring-boot-starter-web'

	compileOnly 'org.projectlombok:lombok:1.18.22'
	annotationProcessor 'org.projectlombok:lombok:1.18.22'
	testCompileOnly 'org.projectlombok:lombok:1.18.22'
	testAnnotationProcessor 'org.projectlombok:lombok:1.18.22'

	testImplementation 'org.springframework.boot:spring-boot-starter-test'
	testImplementation 'org.springframework.amqp:spring-rabbit-test'
}
Application property
spring.rabbitmq.host=192.168.1.33
spring.rabbitmq.port=5672
spring.rabbitmq.username= guest
spring.rabbitmq.password= guest

c4c.topic.exchange = spring.topic.exchange
c4c.topic.routing.key = #.queue.#
c4c.queue1 = c4c.queue1
c4c.queue2 = c4c.queue2
In the above properties, you can see RabbitMQ connection information. I used one topic type exchange and quoting key and 2 queues.
I will send a message in exchange and listen to two topics. I will configure two bindings to send one message to two queues. I will suggest reading this tutorial to learn about routing key formats RabbitMQ tutorial – Topics — RabbitMQ.
Spring RabbitMQ config
In this code, I defined 2 queues, 1 exchange, and two bindings. Apart from this I optionally create a RabbitMQ message template with a custom message converter. You can connect those two methods to use the default serializer with the default rabbitmq template.
In this config two methods are commented, there can be used to configure listener with default rabbitmq template without using @RabbitListener annotation. But in working code, I used @RabbitListener annotation.
@Configuration
public class RabbitConfig {

    @Value("${c4c.queue1}")
    private String queue1;

    @Value("${c4c.queue2}")
    private String queue2;

    @Value("${c4c.topic.exchange}")
    private String exchange;

    @Value("${c4c.topic.routing.key}")
    private String routingKey;

    @Bean(name = "queue1")
    Queue queue1(){
        // Durable false, not survive server restart
        return new Queue(queue1, false);
    }

    @Bean(name = "queue2")
    Queue queue2(){
        // Durable false, not survive server restart
        return new Queue(queue2, false);
    }

    // Create exchange base on topic
    @Bean(name = "topicExchange")
    public TopicExchange topicExchange(){
        return new TopicExchange(exchange);
    }

    @Bean
    public Binding binding1( @Qualifier("queue1") Queue queue,
                            @Qualifier("topicExchange") TopicExchange exchange){
        // Routing ke can be queue name exact or with patterns
        // Can use multiple using coma separated
        // * (star) can substitute for exactly one word.
        // # (hash) can substitute for zero or more words.
        // Example *.CORE.#,#.LIFE_CYCLE.#,#.SUBSCRIPTION_TERMS.#,#.SNAPSHOT.*
        // https://www.rabbitmq.com/tutorials/tutorial-five-python.html
        return BindingBuilder.bind(queue).to(exchange).with(routingKey);
    }
    @Bean
    public Binding binding2( @Qualifier("queue2") Queue queue,
                             @Qualifier("topicExchange") TopicExchange exchange){
        return BindingBuilder.bind(queue).to(exchange).with(routingKey);
    }

    // Below configs are optional, remove the two methods below to use
    // the default serialization / deserialization (instead of JSON)
    @Bean
    public RabbitTemplate rabbitTemplate(final ConnectionFactory connectionFactory) {
        final RabbitTemplate rabbitTemplate = new RabbitTemplate(connectionFactory);
        rabbitTemplate.setMessageConverter(producerJackson2MessageConverter());
        return rabbitTemplate;
    }
    @Bean
    public Jackson2JsonMessageConverter producerJackson2MessageConverter() {
        return new Jackson2JsonMessageConverter();
    }
    // Below two method are used to configure listener using code with default serializer
    // This can be done using @RabbitListener annotation also
    /*@Bean
    SimpleMessageListenerContainer container(ConnectionFactory connectionFactory,
                                             MessageListenerAdapter listenerAdapter) {
        SimpleMessageListenerContainer container = new SimpleMessageListenerContainer();
        container.setConnectionFactory(connectionFactory);
        container.setQueueNames(queue1);
        container.setMessageListener(listenerAdapter);
        return container;
    }
    @Bean
    MessageListenerAdapter listenerAdapter(MessageListener receiver) {
        // bean and listener method name
        return new MessageListenerAdapter(receiver, "receiveMessage");
    }*/
}
Listener and Message sender classes
In Listener for a demo, I used a scheduler with two methods to send sample messages. Use @EnableScheduling on Application class.
@Data
@AllArgsConstructor
@NoArgsConstructor
public class MessageLoad implements Serializable {
    private String id;
    private String data;
}

@Service
public class MessageSender {
    private static final Logger LOG = LoggerFactory.getLogger(MessageSender.class);

    @Value("${c4c.topic.exchange}")
    private String exchange;

    @Value("${c4c.topic.routing.key}")
    private String routingKey;

    private final RabbitTemplate rabbitTemplate;
    private Integer id=0;
    @Autowired
    public MessageSender(final RabbitTemplate rabbitTemplate) {
        this.rabbitTemplate = rabbitTemplate;
    }

    @Scheduled(fixedDelay = 1000L)
    public void sendMessage1() {
        final MessageLoad message = new MessageLoad(String.valueOf(++id),
                "Message at time " + LocalTime.now().toString());
        LOG.info("Sending message...");
        rabbitTemplate.convertAndSend(exchange, routingKey, message);
    }

    @Scheduled(fixedDelay = 2000L)
    public void sendMessage2() {
        final MessageLoad message = new MessageLoad(String.valueOf(++id),
                "Message at time " + LocalTime.now().toString());
        LOG.info("Sending message...");
        rabbitTemplate.convertAndSend(exchange, routingKey, message);
    }
}

@Service
public class MessageListener {
    private static final Logger LOG = LoggerFactory.getLogger(MessageListener.class);

    @RabbitListener(queues = "${c4c.queue1}")
    public void receiveMessage1(final MessageLoad messageLoad) {
        LOG.info("Received message as a AMQP 'MessageLoad' wrapper: {}", messageLoad.toString());
    }

    @RabbitListener(queues = "${c4c.queue2}")
    public void receiveMessage2(final MessageLoad messageLoad) {
        LOG.info("Received message and deserialized to 'MessageLoad': {}", messageLoad.toString());
    }

    // Can be invoked via MessageListener adapter config
    // If don't want to use @RabbitListener annotation
    public void receiveMessage(final MessageLoad message) {
        LOG.info("Received message and deserialized to 'MessageLoad': {}", message.toString());
    }
}
Output
2022-03-06 09:56:24.701  INFO 5720 --- [   scheduling-1] c.c.r.core.service.sender.MessageSender  : Sending message...
2022-03-06 09:56:24.702  INFO 5720 --- [ntContainer#1-1] c.c.r.c.s.listener.MessageListener       : Received message as a AMQP 'MessageLoad' wrapper: MessageLoad(id=1815, data=Message at time 09:56:24.701)
2022-03-06 09:56:24.702  INFO 5720 --- [ntContainer#0-1] c.c.r.c.s.listener.MessageListener       : Received message and deserialized to 'MessageLoad': MessageLoad(id=1815, data=Message at time 09:56:24.701)
You can see one message is received by two listeners. Based on your requirement and you can use an appropriate type of exchange and routing key.
After Running this sample you can check exchange, binding, connection, queues in the RabbitMQ console.
RabbitMQ Management Console Overview
You can check the management console using a web browser and the default user name and password is guest/guest. After login Dashboard will look like this.
Overview Tab
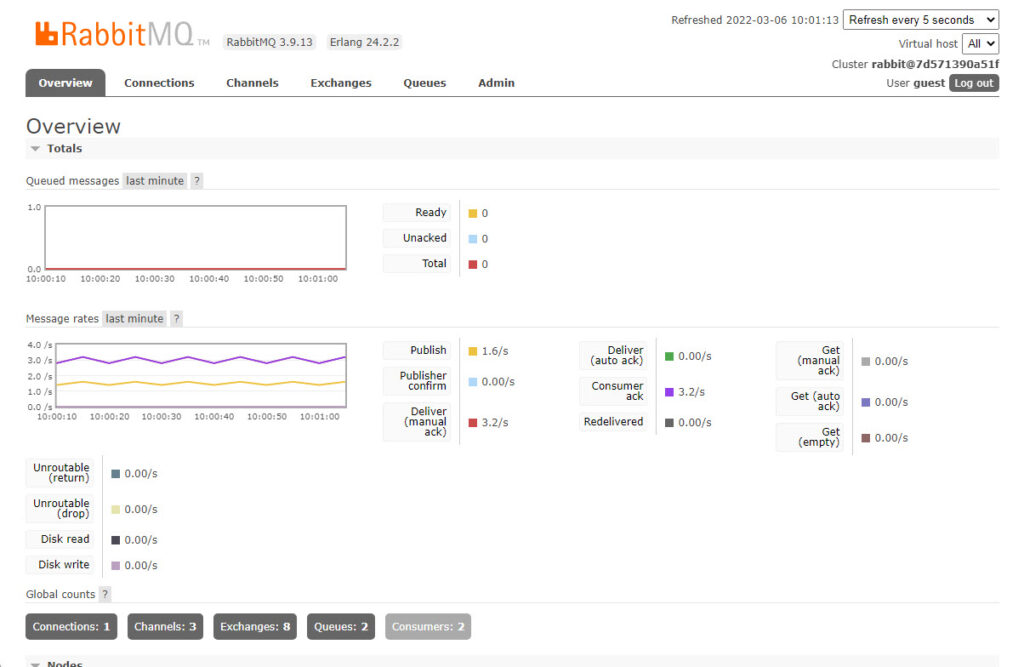
On the overview tab, you can see the current state of the RabbitMQ server like no active connection, channels, exchange, queue, and consumers.
In the Churn statistics section, you can visualize different operations in graph form.
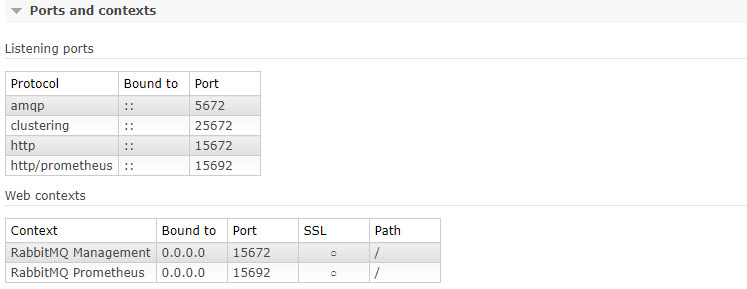
In the Ports and Contexts, you can see was are ports have been configured and what are the contexts available. By default, it will look like this.
Connection tab
In this tab, you can see the active connections with the RabbitMQ server.
Channels Tab
On this tab, you see different changes used.
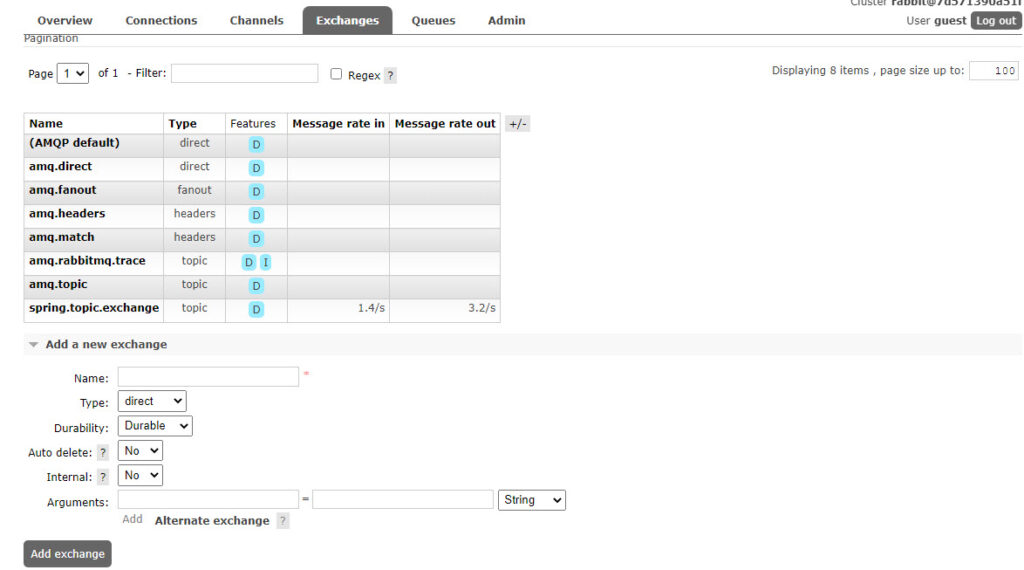
Exchange Tab
On the change tab, you can see different types of exchanges configured and you can create new and delete exchanges using GUI. You can see the existing exchange state and configure bindings with other queues and exchanges.
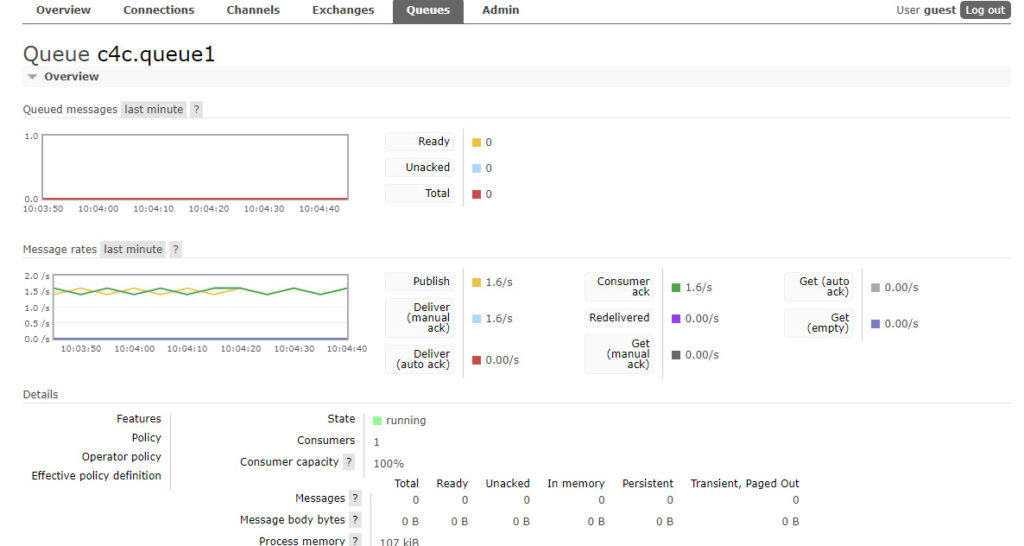
Queues Tab
On this tab, you can manage queues like creating new ques, deleting ques configuring ques binding, and other operations related to the queues.
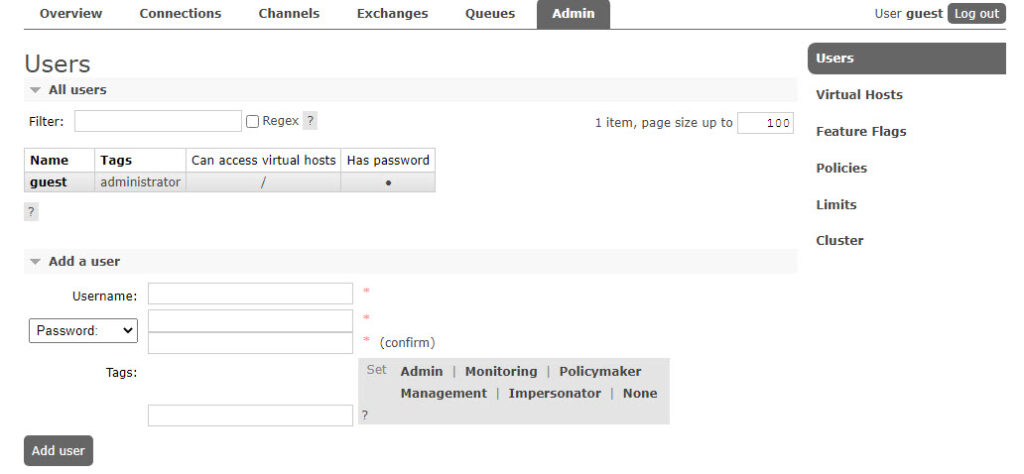
Admin Tab
From the admin tab, you can do User management, Manage Virtual Hosts, Manage feature flags, Manage policies, set up limits, and manage clusters.
You can find the complete source at GitHub Repo spring-boot-examples/rabbitmq-example at main · sheelprabhakar/spring-boot-examples (github.com)